
TL;DR
- Good photos help buyers feel confident enough to click, read and buy.
- You do not need expensive gear, but you do need clear angles, steady framing and even light.
- A simple repeatable setup is better than chasing perfection every time.
Why Photos Matter So Much on eBay
On eBay, your photos do a lot of the work that a real shop shelf would normally do. Buyers cannot pick up the item, turn it over in their hands, or inspect it under better light, so they rely on your images to answer their questions before they ever read the description.
That means strong photos are not just about making an item look attractive. They reduce uncertainty. They help buyers judge condition, size, colour and completeness. They also help cut down on messages, misunderstandings and returns. In many cases, a buyer will decide whether to keep scrolling or stop at your listing based on the first image alone.
The good news is that you do not need a professional studio to get solid results. What matters more is consistency. If your photos are clear, honest and well lit, you are already ahead of a large number of casual sellers.
The Goal: Clarity First, Then Appeal
It is easy to get distracted trying to make every item look artistic, but clarity should come first. Buyers want to know what the item is, what condition it is in, and whether it matches what they are searching for. Once your photos do that well, the listing will naturally look more professional.
A good photo set should answer the obvious questions without forcing the buyer to guess. Is the item clean? Does it have damage? Are all the pieces there? What does the base look like? Is the label still attached? Does the colour lean warm or cool? The best listings quietly answer these questions through images before the buyer even thinks to ask them.
The 7 Essential Angles
You do not need dozens of photos for every ordinary item, but you do need the right ones. A simple repeatable sequence makes listing faster and gives buyers a better experience.
1. The Hero Shot
This is the main image, the one that stops the scroll. It should show the item clearly, front-on or from its most recognisable angle, against a clean and uncluttered background. The buyer should be able to tell in a second what the item is and whether it looks worth clicking on.
Keep the frame tight enough that the item fills most of the image, but do not crop so closely that it feels cramped. For sets or grouped items, arrange them neatly and make sure the main photo shows exactly what is included.
2. The Opposite Side
Once the buyer has seen the front, they will want to know what the other side looks like. This sounds obvious, but it is one of the easiest ways to build trust. Showing the reverse tells the buyer you are not hiding anything and gives a more complete sense of shape, condition and design.
For many items, the back can also reveal useful details such as fittings, wear, maker marks, seams, connectors or damage.
3. The Side Profile
A side angle helps show depth, thickness and form. This is particularly useful for items that are sculptural, bulky, layered or shaped in a way that does not come across well in a flat front photo.
Even for fairly ordinary items, a side view helps the buyer understand proportions. It is often the difference between an item looking vague and looking real.
4. The Base or Underside
The underside is one of the most useful photos in many categories. It often reveals maker’s marks, model numbers, origin labels, condition issues, wear patterns and proof of authenticity. Even when there is nothing remarkable underneath, including this shot reassures buyers that you have documented the item properly.
For anything collectible, branded or vintage, this image can be especially important. A clear underside shot can sometimes answer the question that closes the sale.
5. A Close-Up of Detail
Every item has something worth zooming in on. It might be the texture, pattern, finish, stitching, buttons, controls, design detail, or branding. A close-up helps the buyer feel closer to the object and gives them confidence that they are seeing the real condition rather than a vague overview.
This is also a good place to show anything that makes the item stand out from similar listings. If there is a feature that makes buyers search for this particular version, make sure it gets its own image.
6. Any Damage or Wear
This is one of the most important photos in the whole listing. If there is a chip, scratch, crack, scuff, stain, dent or worn area, photograph it clearly. Do not hide it, soften it, or hope the description will do the work later.
Honest flaw photos reduce disputes and returns, but they also do something less obvious: they build trust. Buyers know that most used items are not perfect. What makes them nervous is uncertainty. When you show flaws clearly, the buyer feels that the rest of the listing is probably honest too.
7. A Scale or Context Shot
Some items are much bigger or smaller than people expect. A scale shot helps avoid confusion. This can be done with a ruler, measuring tape, hand-held photo, or a familiar object for reference, depending on the item.
The purpose is not to replace written measurements, but to support them. Buyers often skim descriptions, so a visual size cue can save you from “I thought it would be bigger” problems later.
The Real Secret: Use the Same Photo Flow Every Time
One of the easiest ways to speed up listing is to stop reinventing the process. If you photograph every item in the same basic order, it becomes much faster and easier to spot what is missing before you put the item away.
A repeatable flow might be hero shot, back, side, underside, detail, flaw, then scale. That sequence works for a wide range of items and gives you a checklist you can run through almost without thinking. The more consistent your process becomes, the easier it is to batch listings and maintain a professional look across your store.
Lighting Matters More Than Camera Quality
People often assume they need a better phone or camera to improve their eBay photos. In reality, lighting usually makes the bigger difference. A modest camera in good light will often produce better results than an expensive camera in poor light.
Bad lighting creates shadows, yellow tones, blown highlights and dull-looking images. Good lighting makes colours look more accurate, reduces harsh contrast and helps the item stand out cleanly from the background. It also makes flaws easier to photograph honestly, which is important for buyer trust.
Natural daylight near a window can work very well, especially if it is bright but not harsh. The downside is that it changes depending on the time of day, weather and season. If you want more consistency, a simple artificial lighting setup can save time and make your photos look more even from one listing to the next.
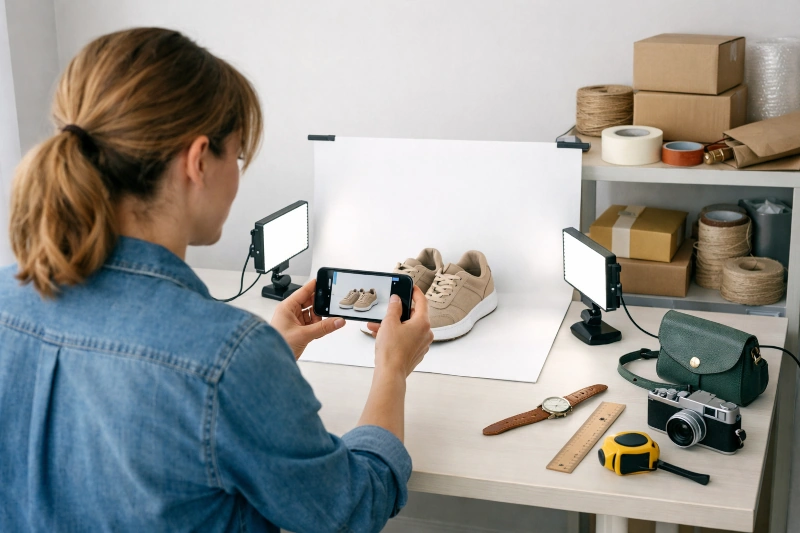
A Fast Lighting Setup That Works for Most Sellers
You do not need a dedicated studio to get a big improvement in your listing photos. A simple setup in a spare corner, on a desk, or at one end of a table can be enough. The key is to keep it easy to repeat.
Start with a plain background that does not distract from the item. This could be a white sheet, a neutral backdrop, a roll of paper or a clean tabletop depending on what you are photographing. Then add two light sources, one on each side, to reduce deep shadows and spread the light more evenly across the item.
For many sellers, this is where it makes sense to link naturally to simple gear on eBay. For example, you might mention using a pair of LED panel lights, a basic softbox lighting kit, or a ring light with stand if you are working in a small space. If glare is a problem, especially with shiny surfaces, a light diffuser or even a white cloth panel can help soften the reflections. For smaller items, some sellers also like a foldable photo light box because it keeps the background and lighting consistent in one compact setup.
The aim is not to make your setup fancy. It is to make it easy enough that you will actually use it. If the lights are too awkward to drag out each time, you will put the job off. If they are simple and ready to go, listing becomes much easier.
Avoiding Harsh Shadows and Glare
Shadows and reflections are two of the biggest things that make listings look amateur. They can hide details, distort the shape of the item, and make the overall photo feel messy or hard to read.
The quickest fix is usually to move the lights slightly away from direct head-on angles and let them wash across the item from each side. If the item is glossy, metallic or glassy, try changing the angle of the object rather than the angle of the camera first. A small adjustment can make a big difference to glare.
Soft, even light is usually more useful than dramatic light. On eBay, the goal is not mood. It is visibility.
Backgrounds: Keep Them Simple
A clean background helps the buyer focus on the item. White is popular because it looks tidy and works well in search results, but it is not the only option. Light neutral tones can also work nicely, especially if white causes the item to blend in too much.
What matters most is that the background does not compete with the item. Busy patterns, wrinkled fabric, visible household clutter or mixed colours behind the product tend to make listings feel less professional. A simple background also makes it easier to keep your store looking consistent across different listings.
Learn How Your Phone Camera Actually Works
One of the best things a seller can do is spend five minutes learning how their own phone or camera behaves. You do not need to become a photography expert, but you should know how to focus on the item, how close you can get before the image becomes soft, and how your phone reacts to bright backgrounds, reflective surfaces and small text.
A lot of blurry listing photos are not caused by bad equipment. They come from the camera focusing on the background instead of the item, or from the seller assuming the phone will work everything out automatically. Tap the screen where you want the focus to be, especially for close-ups, labels and flaw photos. If your phone has a portrait, macro or document mode, test it before you start listing in bulk and see which one gives the clearest result for the kinds of items you sell.
If you take photos of text, labels, model numbers or paperwork, make sure they can actually be read and zoomed in on. A buyer should not have to guess what a label says or send you a message asking for a clearer photo of the fine print. This is especially important for branded items, instruction booklets, serial numbers, ingredients, care labels and anything else that helps confirm authenticity, size or condition.
Make Your Photos Large and Clear
Aim to upload the biggest clear image your device can comfortably produce, rather than shrinking your photos too much before listing. eBay’s official guidance says listing images need a minimum resolution of 500 × 500 pixels, and it recommends images around 1600 × 1600 pixels. eBay’s AU help pages also say to aim for roughly 800–1600 pixels on the longest side.
In practical terms, that means you should not be afraid to use large images. Bigger, clearer photos generally give buyers a better chance to inspect the item, zoom in on details and feel comfortable buying. The key is not just size for the sake of size, but size plus sharp focus. A large blurry photo is still a blurry photo.
Phone Camera Tips That Actually Help
You do not need to master photography to improve your listings. A few practical habits go a long way.
Clean the camera lens before you start. It sounds minor, but it can make the difference between a crisp image and a slightly hazy one. Hold the phone steady, or brace your elbows against the table if needed. Tap the screen to focus on the item rather than letting the camera guess. Take a second look at the image before moving on, especially for close-ups and flaw shots.
It is also worth photographing from the buyer’s point of view rather than from whatever angle feels easiest. If a detail matters, make sure it is sharp and central. If the colour in the photo looks wrong, adjust your lighting before assuming it can be fixed later.
Edit Lightly, But Stay Honest
A small amount of editing can help your photos look cleaner and more accurate. Straightening the image, cropping out empty space, and slightly adjusting brightness are all reasonable. The purpose of editing should be to make the photo look more like the real item under good light, not to make the item look better than it really is.
Be especially careful with colour. Over-editing can lead to complaints if the item arrives looking different from what the buyer expected. The safest approach is simple correction, not heavy enhancement.
Common Photo Mistakes That Hurt Sales
A lot of slow-moving listings suffer from the same avoidable photo problems. Dark images make buyers uncertain. Cluttered backgrounds make the item feel less valuable. Too few photos leave unanswered questions. Soft focus makes condition hard to judge. Missing flaw photos make buyers nervous.
The other common mistake is inconsistency. If one listing is bright, clean and well framed and the next is dim and rushed, your store starts to feel uneven. A basic repeatable setup solves much of this problem before it starts.
Good Photos Save Time Later
Strong photos do more than improve click-through rates. They also reduce buyer questions, help justify your asking price, and make it easier for buyers to feel comfortable purchasing without extra reassurance. That saves time before the sale and trouble after it.
If you are listing regularly, this matters. A simple photo process that produces clear, honest images can improve your results without adding much work. In fact, it often reduces work because you spend less time answering obvious questions and dealing with disappointed buyers.
Final Thoughts
You do not need to build a studio before you start selling on eBay, but you do need a system. A clean background, a simple lighting setup and the same seven core angles for each item will take you a long way.
The goal is not perfection. It is confidence. When buyers can see what they are getting, understand the condition and feel that nothing is being hidden, they are much more likely to buy.
And if you are only going to improve one part of your listing process first, start with the photos. Better photos help every other part of the listing work harder.
Leave a Reply